
Easy DIY Paper Bag Snowflakes
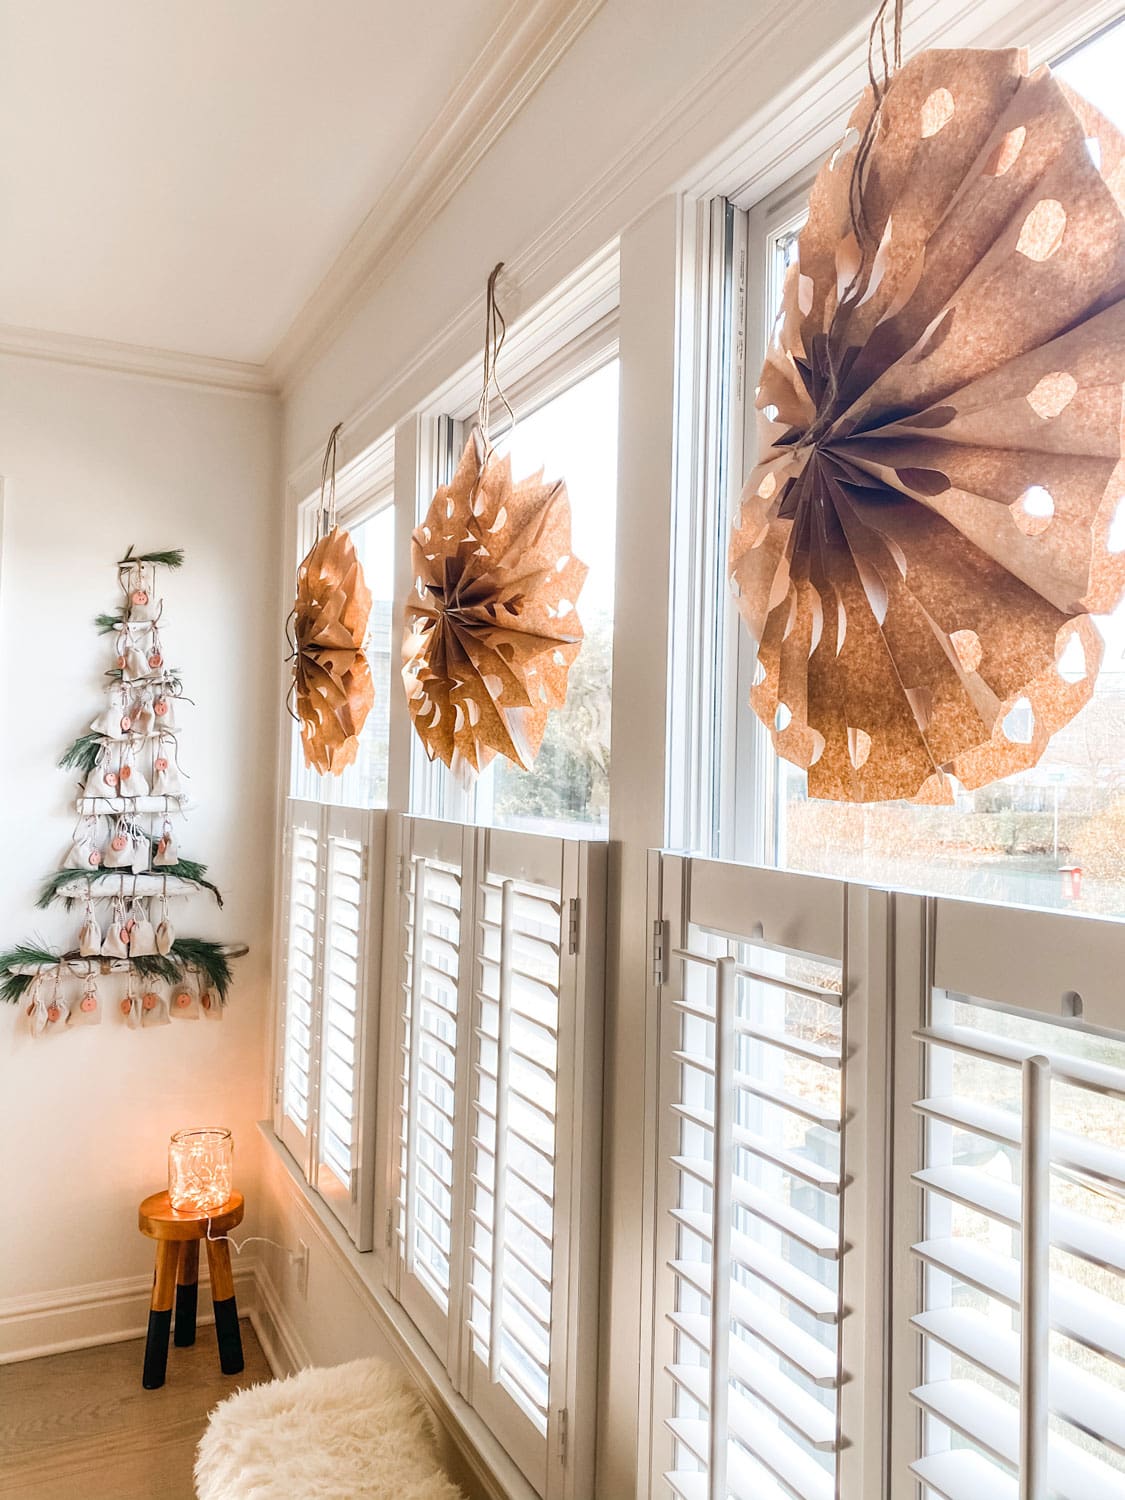
There’s something magical and satisfying about making paper bag snowflakes. Maybe it’s the humble lunch bags, or how easy they are to make. Or maybe it’s just the winter charm they bring to any room. It always amazes me that with just a stack of paper bags, a pair of scissors, and a little glue, you can transform something ordinary into something beautifully delicate and unique.
I love crafting in the winter, gathering craft supplies at my kitchen table, and cutting into fresh stacks of brown paper bags. The process feels almost meditative; cutting the simple shapes, the unfolding, and no two snowflakes are the same.
What’s more, these DIY snowflakes are surprisingly sturdy and lightweight, making them ideal for stringing across windows, hanging from ceiling hooks, or layering on walls. Whether you’re crafting solo with a cup of tea or turning it into a family project, paper bag snowflakes are a way to bring winter and the holiday season inside.
I made these last year using white paper bags and this year since the focus is on Christmas Inspired by Nature, I decided to use the traditional brown paper lunch sacks. I’m still a bit in awe of just how simple it is to create something so cool and one of a kind! You only need a stack of lunch bags, a glue gun, glue sticks, and some string or twine to hang them.
Here’s how to make paper bag snowflakes
- You’ll need these supplies: 8 paper lunch bags, a glue gun, and glue stick, scissors, and twine to hang them.
- Take the bags and stack them with the flap up and facing you.
- Take the first bag and make a “T” using the glue stick and then place the second bag on top and repeat until all 8 bags are glued together.
- Begin to cut shapes from the sides of the bag. I like to keep it symmetrical when cutting the sides. If I cut a half-circle in the middle on one side, I’ll repeat on the other side. To make stars, cut the top of the bags into a tip.
- To make the snowflake, take hold of the two inside (inside) bags and pull around creating a large circle (or snowflake)! Cool, right?
- You can glue one side of the last two sides so that the snowflake or star stays together and then cut a small slit or hole into the two pieces that you are holding to create the snowflake. Put string or twine through to hang on a wall or in a window.

Final thoughts
Once you make your first paper bag snowflake, it’s hard to stop. They’re quick, easy, and surprisingly beautiful. They are the kind of project that instantly brings a little extra coziness into your home. Whether you hang them in a window, group them on a wall, or add a few to your holiday mantel, they create that soft, warm winter feeling we all love.
I hope this easy DIY inspires you to pour a cup of something warm and enjoy a simple craft that feels wonderfully nostalgic. If you make a few snowflakes of your own, I’d love to see them. You can tag me on Instagram @most_lovely_things!


As usual, all great ideas. I am going to make the mask spray although I find when I spray a touch of perfume on my neck and then pull my maks up and down, I get a nice scent. I want that sweatshirt!!
Annie, have you or your sister ever tried the Shiseido eye lash curler? I was going to go to Sephora to buy it tomorrow then I read your post about this one. I read on another blog that the Shiseido one is very eye opening. Just wonder if you or your sister have tried it.
I am seriously in awe of these snowflakes and I cannot believe how innovative you are!! You inspire me Annie!
Aren’t they the coolest for something as cheap and ordinary as lunch bags? Thank you for reading Leslie!xx
The snowflakes are so beautiful!
Aren’t they so fun with such simple supplies?!